
We hope you enjoy our natural kitchen candles, please read the below safety tips and care instructions to get the most out of your candles.
General candle safety tips
-Place candles in an upright position on a level surfaceCandle care burning instructions
-Trim wick to about 0.5 cm before lighting (we have pre-trimmed the wick so for the first lighting there is no need to trim). As we fill our jars to the top, for the first burn please put the wick in an upright position before lighting.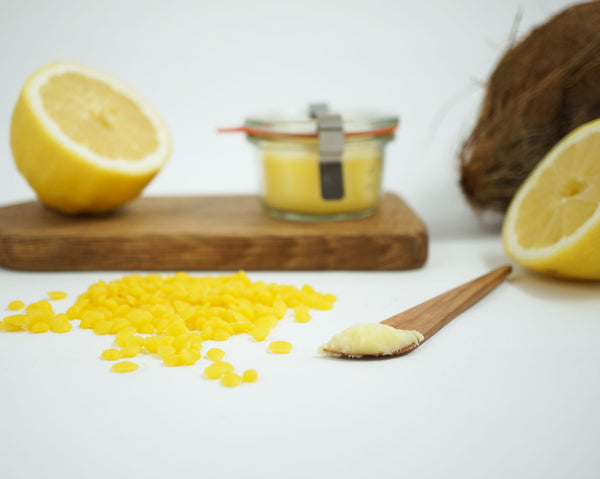
For daily use wash with warm soapy water. Please do not put in the dishwasher or soak. Air or towel dry.
Treat your wood products with our natural 'food-safe' wood butter, made from natural beeswax, coconut oil and essential lemon Oil. The oil conditions the wood whilst the beeswax provides a protective barrier against moisture, and the lemon helps deodorise stale food smells.
Use as needed, whenever the wood seems dry, but at least once a month to maintain the surface.
Treatment instructions:
1) Make sure your wood product is completely clean and dry.Please wash your hands thoroughly after use (to remove any excess butter). When applied with your hands, the butter will leave your hands super smooth, with a lovely natural coconut lemon honey scent.
Wood Butter - After you have used all the wood butter, wipe up any excess with a paper towel until there is no butter residue left. Then wash with hot soapy water and rinse (the labels come off easily at this stage). If you are storing food in your weck jars we recommend sterilising your jars.
Kitchen Candles - When you are ready to clean out your candle, use a clean dry knife to remove any wax left at the bottom and remove the metal wick stabiliser and the stickers. To remove all the wax we recommend either heating the jar on a low heat in the microwave for 30-60 seconds, or in the oven on the lowest heat for 5-10 minutes. Once the leftover wax has melted you can wipe up with a paper towel until there is no wax residue left but please be careful as the glass jars will be hot so please hold the jar with an oven glove. Leave the jar to cool, then wash with hot soapy water and rinse .If you are storing food in your weck jars we recommend sterilising your jars.
Sterilising your jars - Place your rinsed jars and lids on a baking sheet (but not the rubber seals or metal clips). Heat your oven to 120 / 100°C (fan) and put your jars in the oven to dry out completely for about 20 mins. The rubber seals can be sterilised in simmering hot water, for about 10 mins.

We recommend you wash your denim as little as possible to maintain the deep Indigo colour. If you just have small stains, these can be removed with a little spot cleaning.
Spot cleaning - Ideally wipe any excess stuff from the denim as soon as it happens, so it does not stain too deeply (things like chilli sauce). Use a wet cloth or towel with a little mild soap to gently wipe away any residue left and the stain seems to have disappeared, dab afterwards with some water and a damp cloth to remove any soap. Then let it air dry but not in direct sunlight. Depending on the severity of the stain, you may need to repeat this process again.
When you are ready to clean!
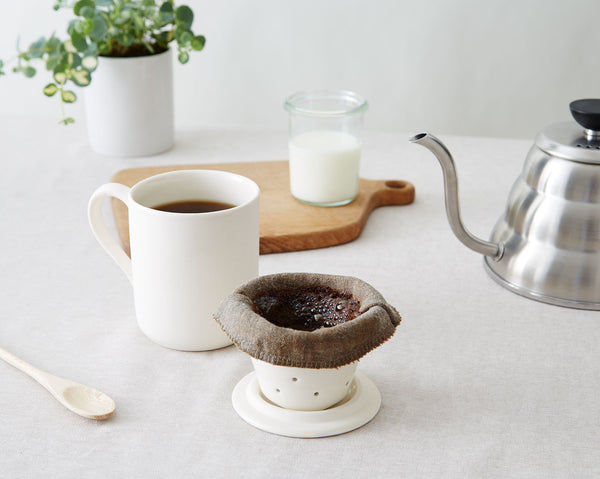
Our Linen filters have been pre-washed without detergent. Before every use please dampen in water, wring out the excess water and place in the strainer; folding the top of the filter over the edge of the strainer.
For coffee: use your desired amount of coffee and slowly pour boiled water over, let it drip through, then slowly pour again. The grounds will have moved to the side of the filter; for the second pour, pour around the edges of the filter to move the grounds to the centre again, to get a fuller brew. As you pour you will see the water rise into the filter, lift out the strainer and let the last bit drip through. Rest the strainer on the lid for later.
For tea: refer to the coffee instructions, but when there is a little water in the bottom of the strainer (about a third), let your tea brew for the desired time with the lid on. When finished lift out the strainer and let the last bit drip through. Rest the strainer on the lid, depending on the tea and your taste this can later be reused for another cup. This method can be used with or without the filter depending on your tea of choice.
After use, discard the coffee grounds or tea leaves by turning the filter inside out and use a teaspoon to gently scrape off the excess into a bin (great for your compost). Then thoroughly rinse in warm water water. Hang the filter to dry. Every couple of months (depending on usage), you can boil in water for 10 mins to remove any residue build up.